Your Legal Resource
Aaron Nabil's Hickok Tube Tester Settings
My first attempt at OCR was the hard-to-find instructions of how to program a Cardmatic by punching your own cards. You also need the schematic and theory of operation, but these are in the standard operating manual. These files are both referenced on my USM-118 Cardmatic tester page.
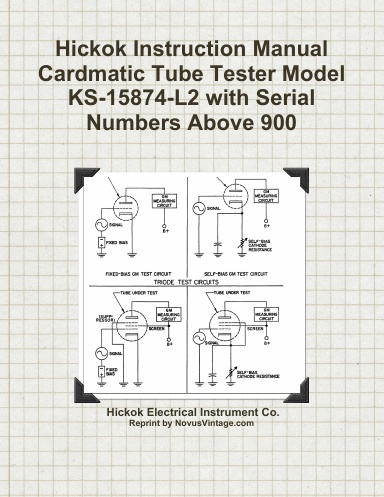
This is a reprint of the complete manual for the Hickok/Western Electric KS-15874-L2 Cardmatic Tube Tester. It contains the complete operating instructions, circuit theory and description, maintenance/troubleshooting information, parts list, and schematic. Complete calibration instructions are provided. This book describes the KS-15874 Electron Tube Tester and gives the methods for operating and maintaining the set. This tube tester is for general Bell System use. It is capable of testing practically all small-sized, low-power tubes of Western Electric Company or other manufacture. The set is semi-automatic in operation. Testing of tubes is done by selecting and inserting a punched card which automatically programs test conditions. This is in lieu of roll charts and manual selectors which were used on previous testers. Dynamic tests are performed under conditions that are as close as possible to the operating condition of the tube rather than a common operating point as was formerly done.